How to Use WebRTC Android SDK?
Ant Media Server has native mobile SDKs (IOS and Android) for WebRTC. You can use WebRTC facilities in Android Platform with the help of Ant Media Server’s Native Android WebRTC SDK. In this blog post, features of Android SDK will be presented with a sample Android project which comes bundled with the SDK.
This SDK has the following main features:
- Provides peer to peer WebRTC communication between Android devices and browsers by using Ant Media server as a signalling server.
- Could publish WebRTC stream which could be played by other Android devices and browsers (mobile or desktop).
- Could play WebRTC stream which is published by other Android devices and browsers (mobile or desktop).
- Could join conference room that is created in Ant Media Server.

Prerequisites for WebRTC Android SDK
WebRTC iOS and Android SDK’s are free to download. You can access them through this link on antmedia.io. If you’re an enterprise user, it will be also available for you to download in your subscription page. Anyway, after you download the SDK, you can just unzip the file.You could also obtain a trial version of Ant Media Server Enterprise Edition from here.
Run the Sample WebRTC Android App
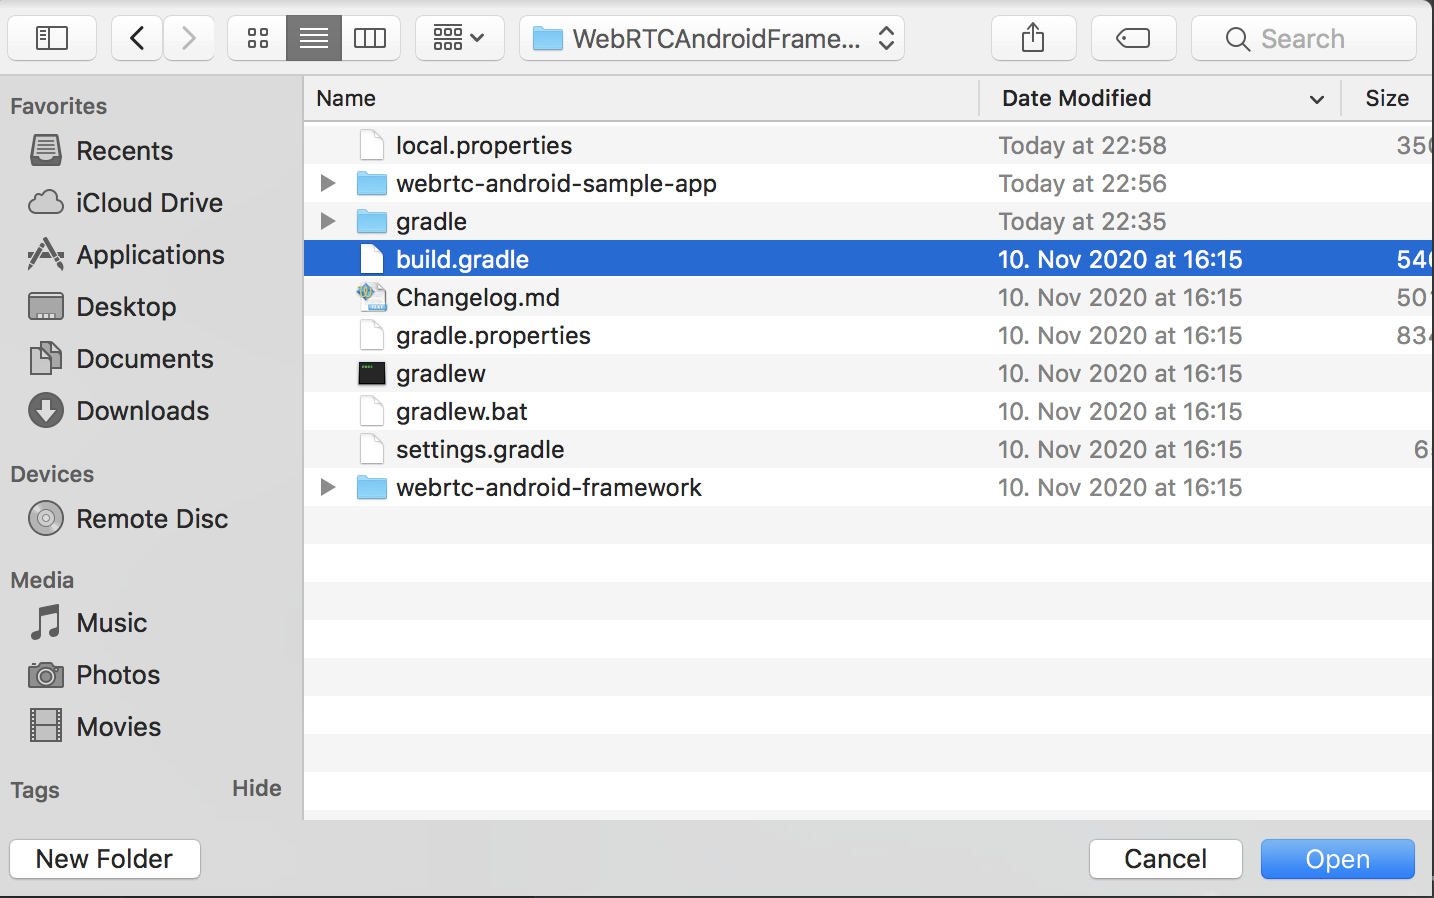
After downloading the SDK, open and run the sample project in Android Studio.
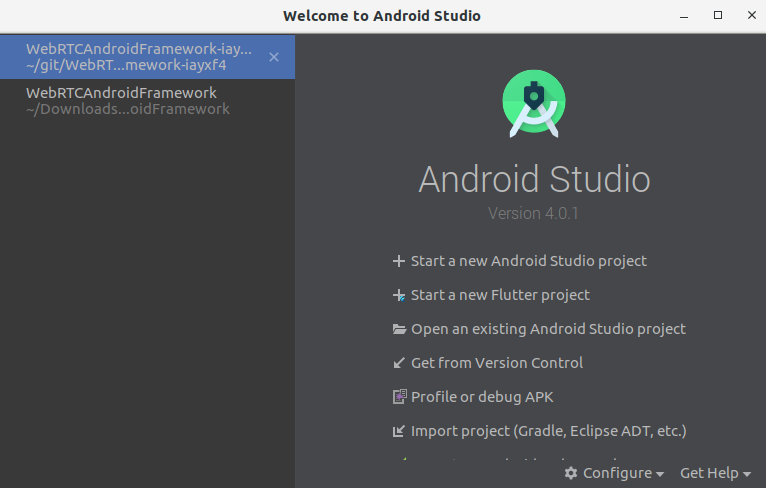
Select your project’s build.gradle file path and Click to the OK button.
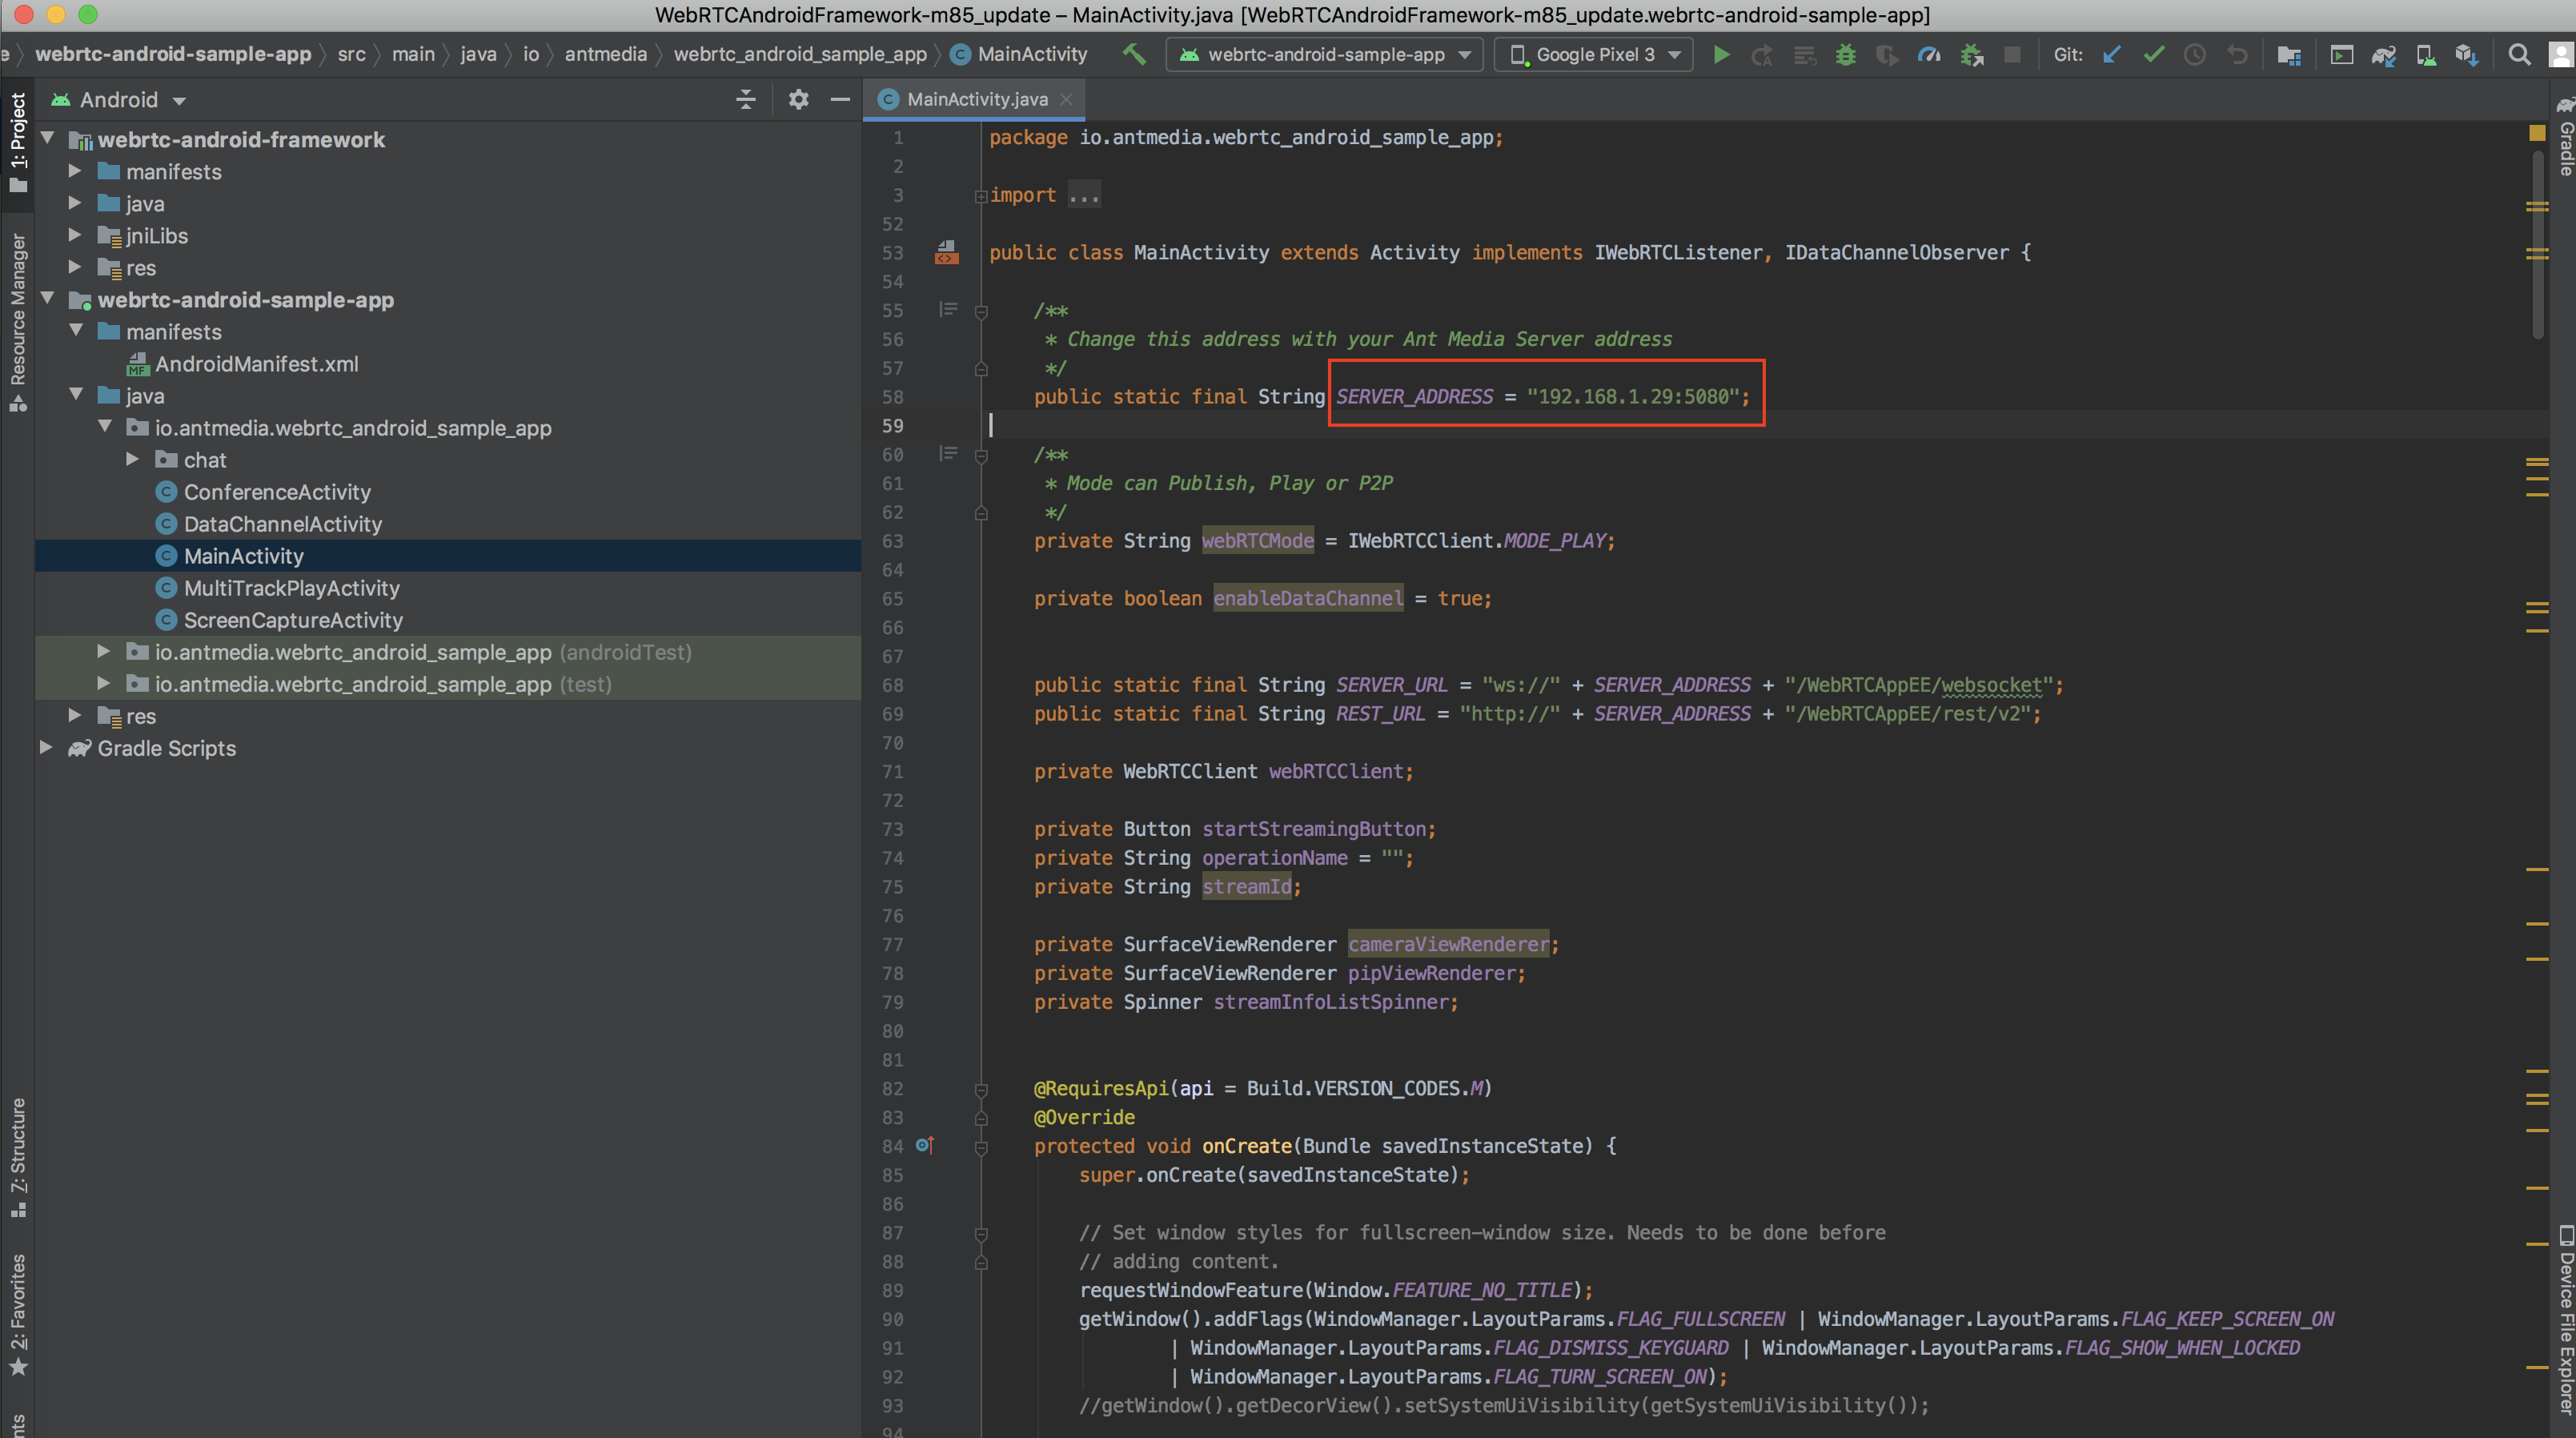
PS: You need to set SERVER_ADDRESS parameter in MainActivity.java:
Publish Stream from your Android
- In
MainActivity.java, you need to setwebRTCModeparameter toIWebRTCClient.MODE-PUBLISH - In
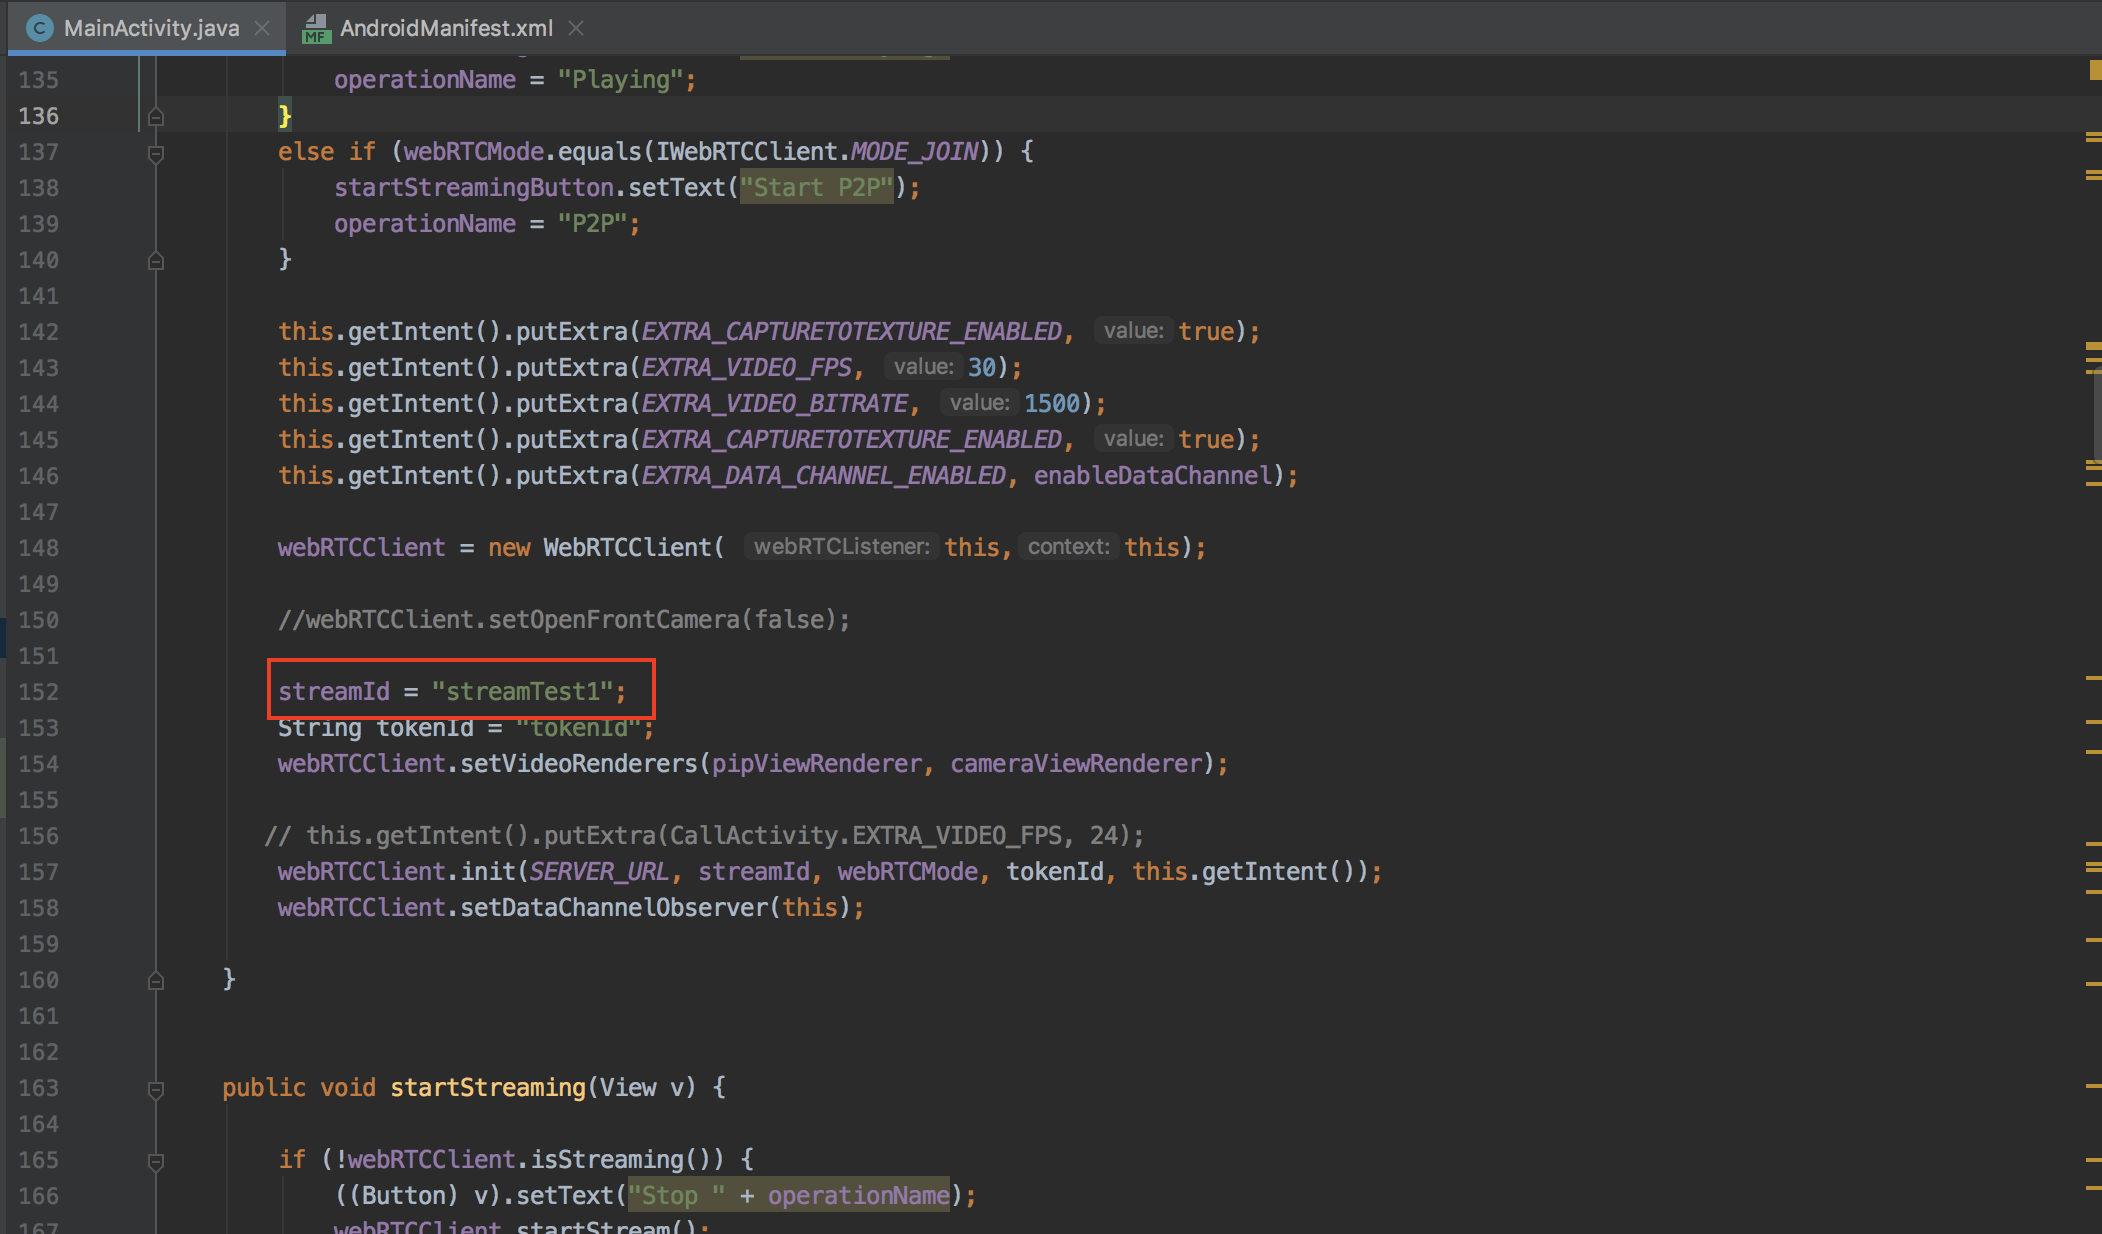
MainActivity.java, set the stream id to anything else thenstream1i.estreamTest1:
- Tap
Start Publishingbutton on the main screen. After the clickingStart Publishing, stream will be published on Ant Media Server. - Then it will start Publishing to your Ant Media Server. You can go to the web panel of Ant Media Server(http://server_ip:5080) and watch the stream there. You can also quickly play the stream via
https://your_domain:5443/WebRTCAppEE/player.html
Play Stream from your Android
- Firstly, you need to set
webRTCModeparameter toIWebRTCClient.MODE_PLAYinMainActivity.java. - Playing stream on your Android is almost the same as Publishing. Before playing, make sure that there is a stream that is already publishing to the server with same stream id in your
streamIdparameter (You can quickly publish to the Ant Media Server viahttps://your_domain:5443/WebRTCAppEE). For our sample, stream id is still “streamTest1” in the image below. Then you just need to tapStart Playingbutton.
P2P Communication with your Android
WebRTC Android SDK also supports P2P communication. As you guess, just set webRTCMode parameter to IWebRTCClient.MODE_JOIN.
When there is another peer is connected to the same stream id via Android, iOS or Web, then P2P communication will be established and you can talk to each other. You can quickly connect to the same stream id via https://your_domain:5443/WebRTCAppEE/peer.html
Join Conference Room with your Android
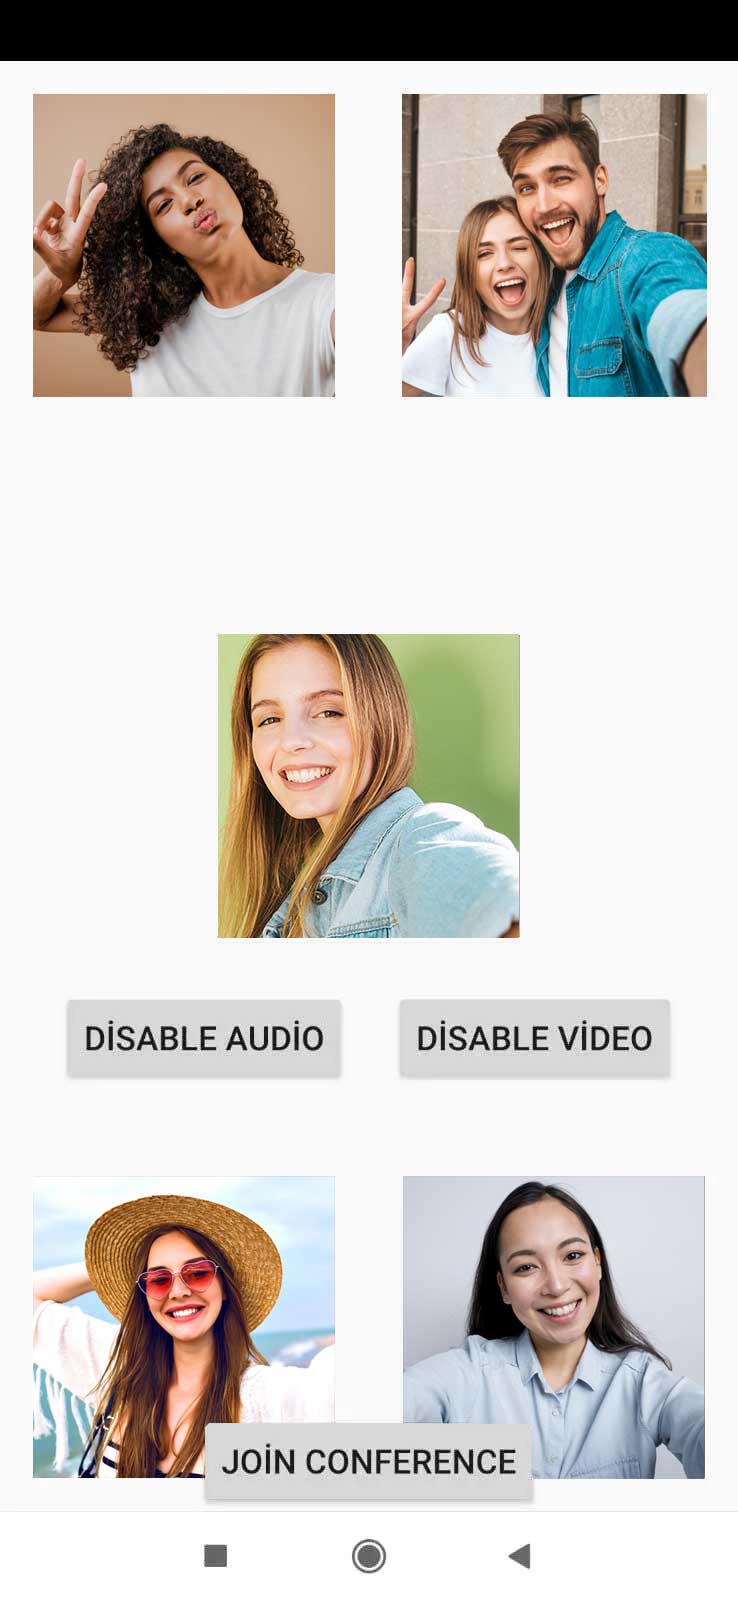
WebRTC Android SDK also supports Conference Room feature. You just need to change the launcher activity to ConferenceActivity.java activity:
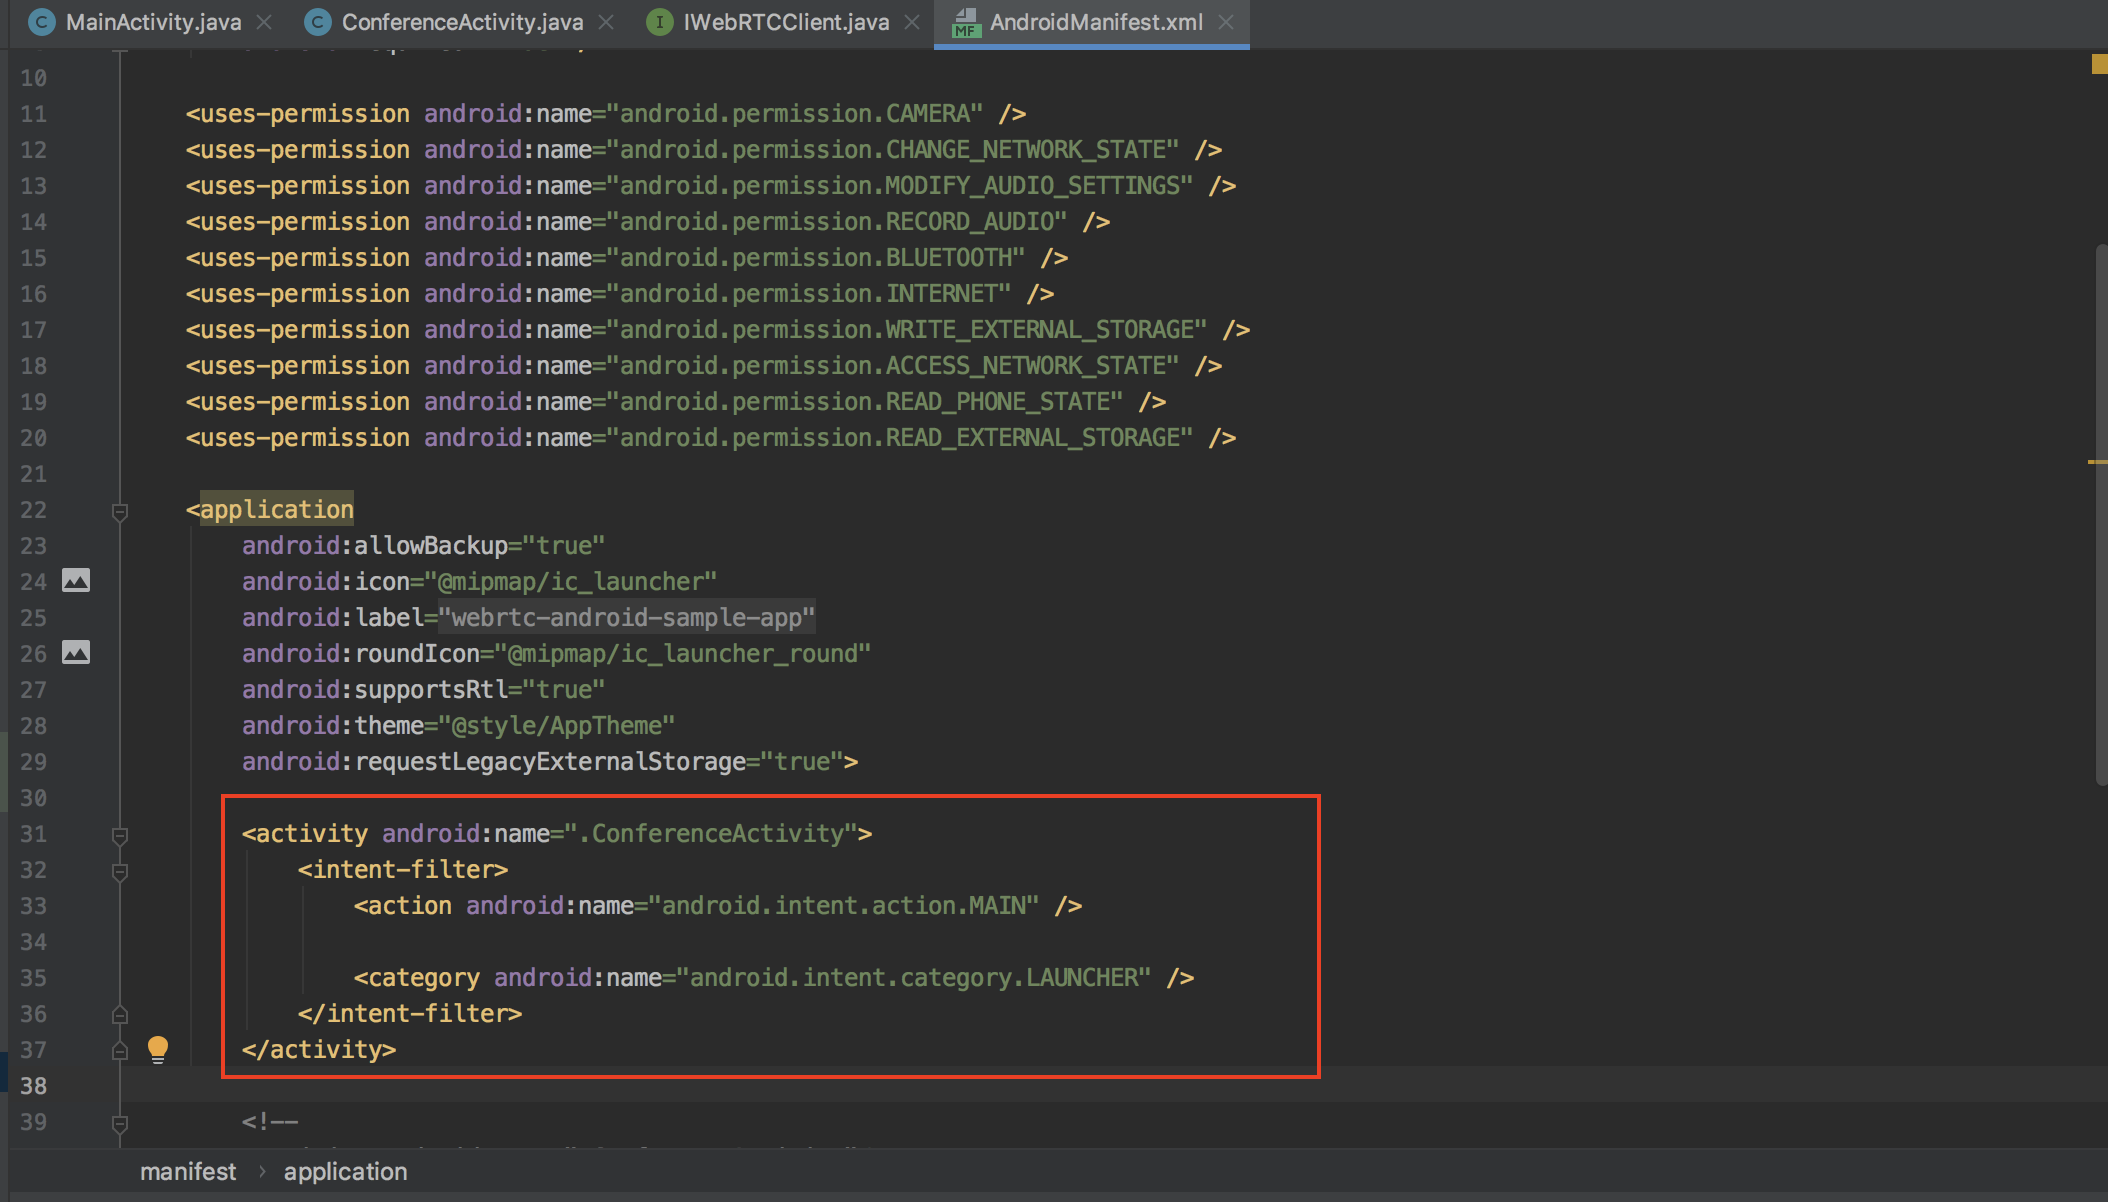
When there are other streams are connected to the same stream id via Android, iOS or Web, then Conference Room will be established and you can talk to each other. You can quickly connect to the same stream id via https://your_domain:5443/WebRTCAppEE/conference.html
Develop a WebRTC Android App
We highly recommend using the sample project to get started your application. Nevertheless, it’s good to know the dependencies and how it works. So that we’re going to tell how to create a WebRTC Android app from Scratch. Let’s get started.
Creating Android Project
Open Android Studio and Create a New Android Project
Just Click File > New > New Project . Choose Empty Activity in the next window:
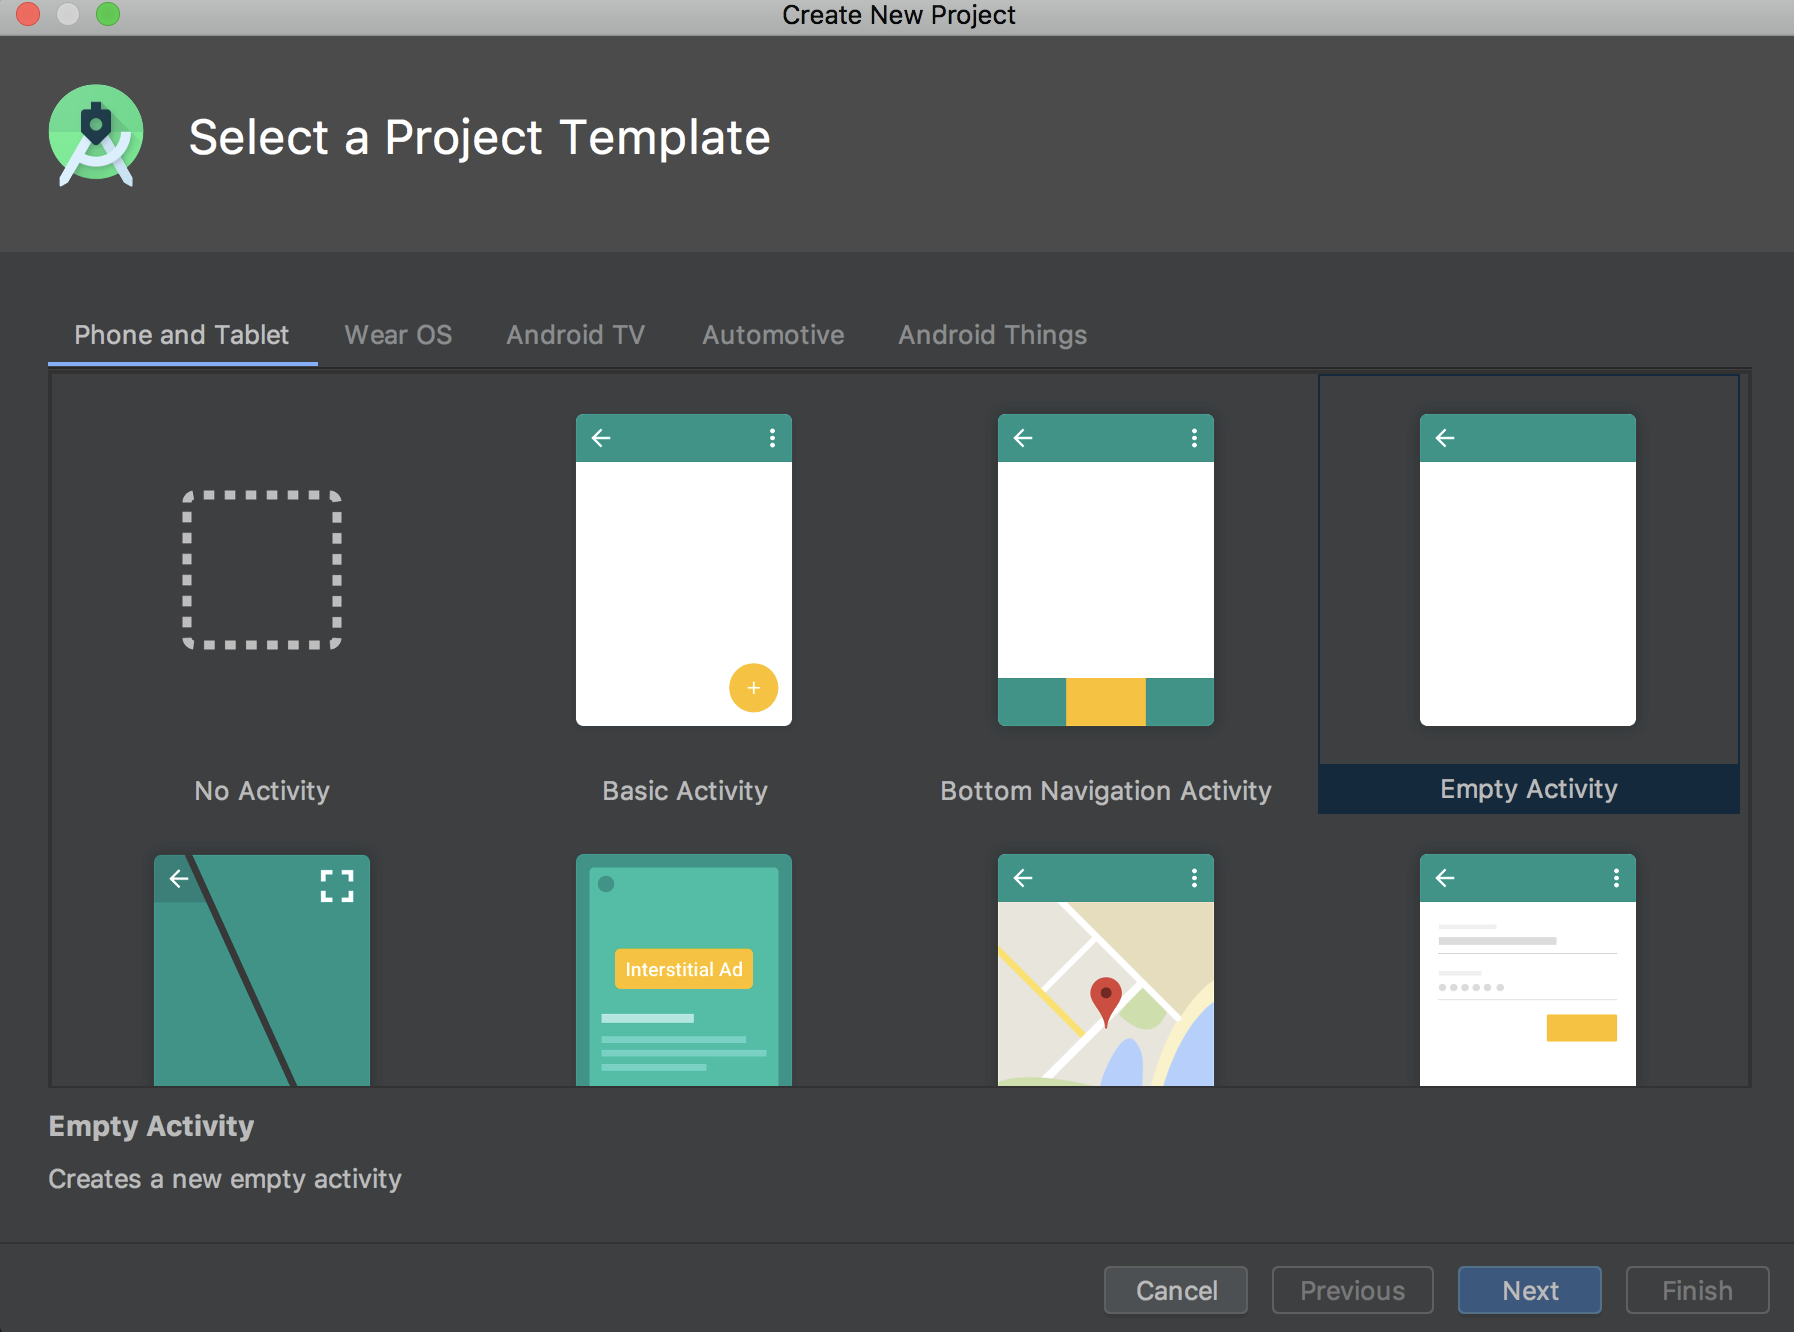
Click Next button and a window should open as shown below for the project details. Fill the form:
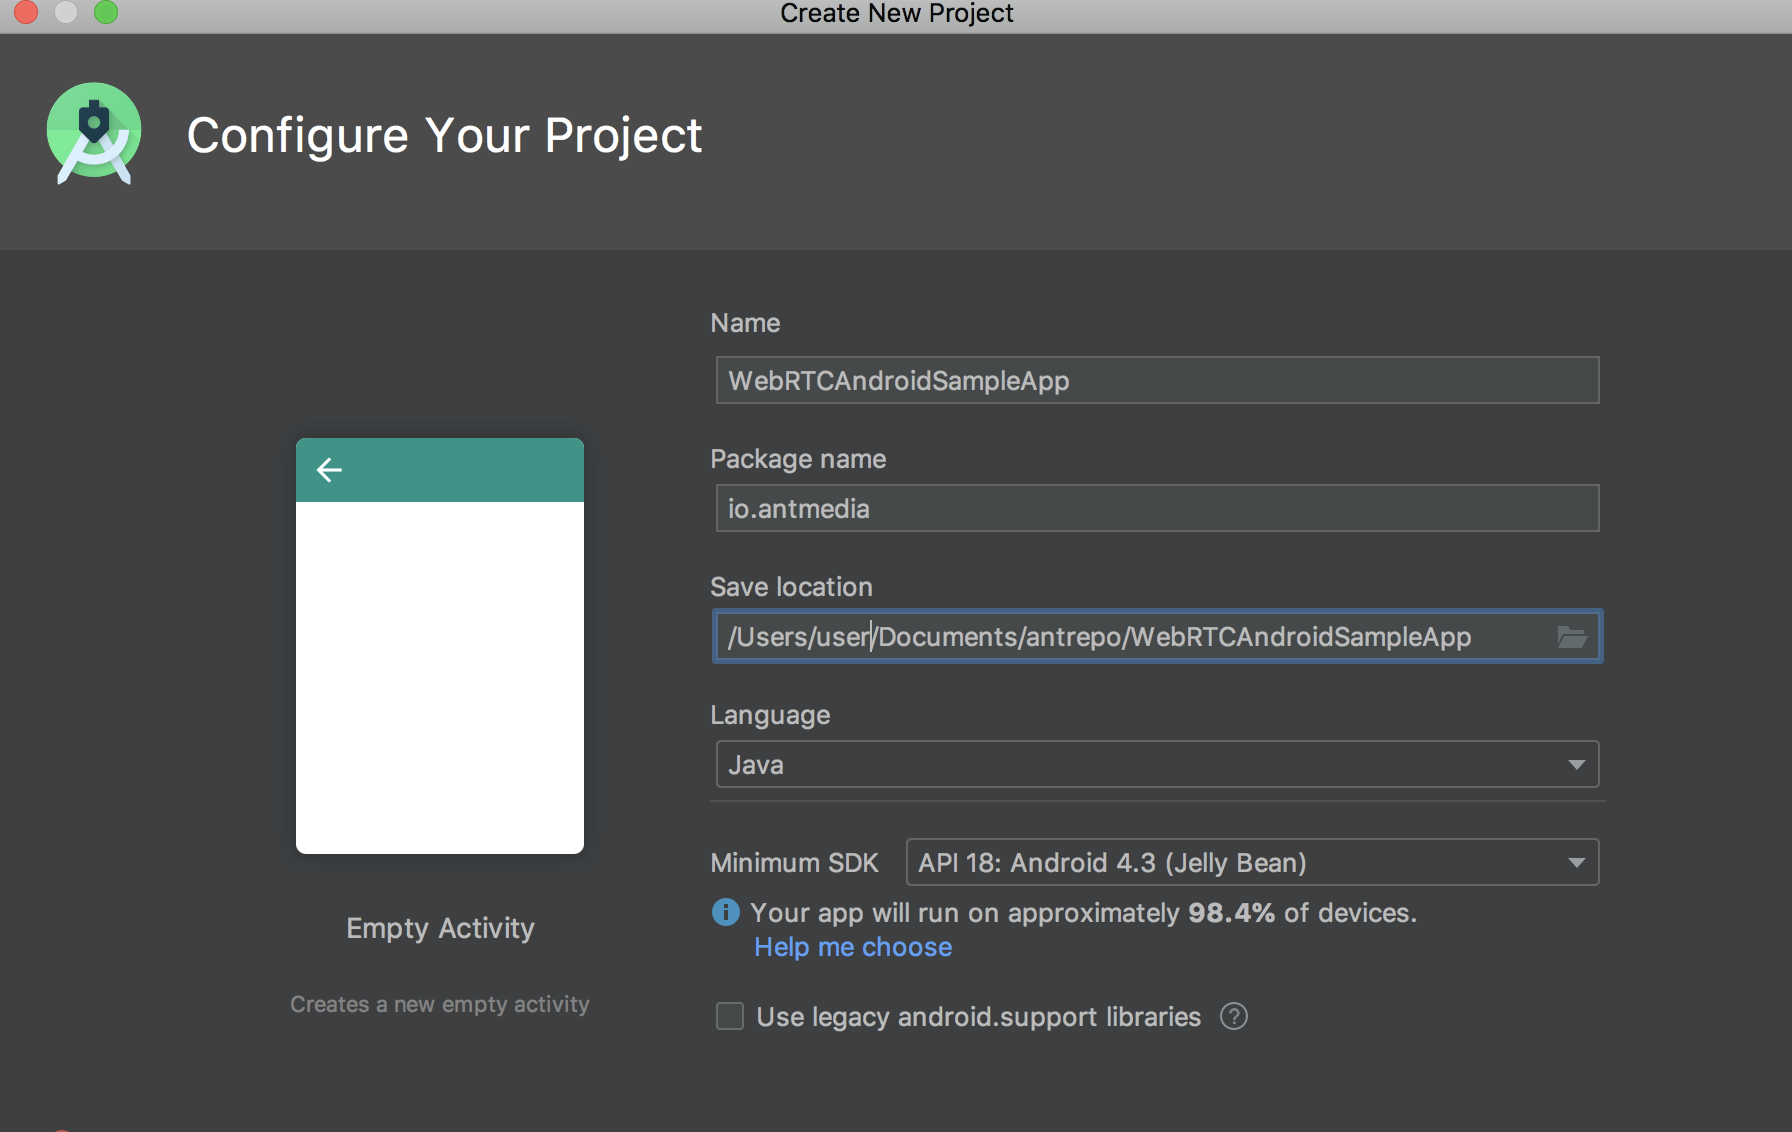
Click Finish and complete creating the project.
Import WebRTC SDK as Module to Android Project
After creating the project. Let’s import the WebRTC Android SDK to the project. For doing that click File > New > Import Module . Choose the directory of the WebRTC Android SDK and click the Finish button.
If module is not included in the project, add the module name into settings.gradle file as shown in the image below.
Add dependency to Android Project App Module
Right-click app, choose Open Module Settingsand click the Dependencies tab. Then a window should appear as below. Click the + button at the bottom and choose `Module Dependency“
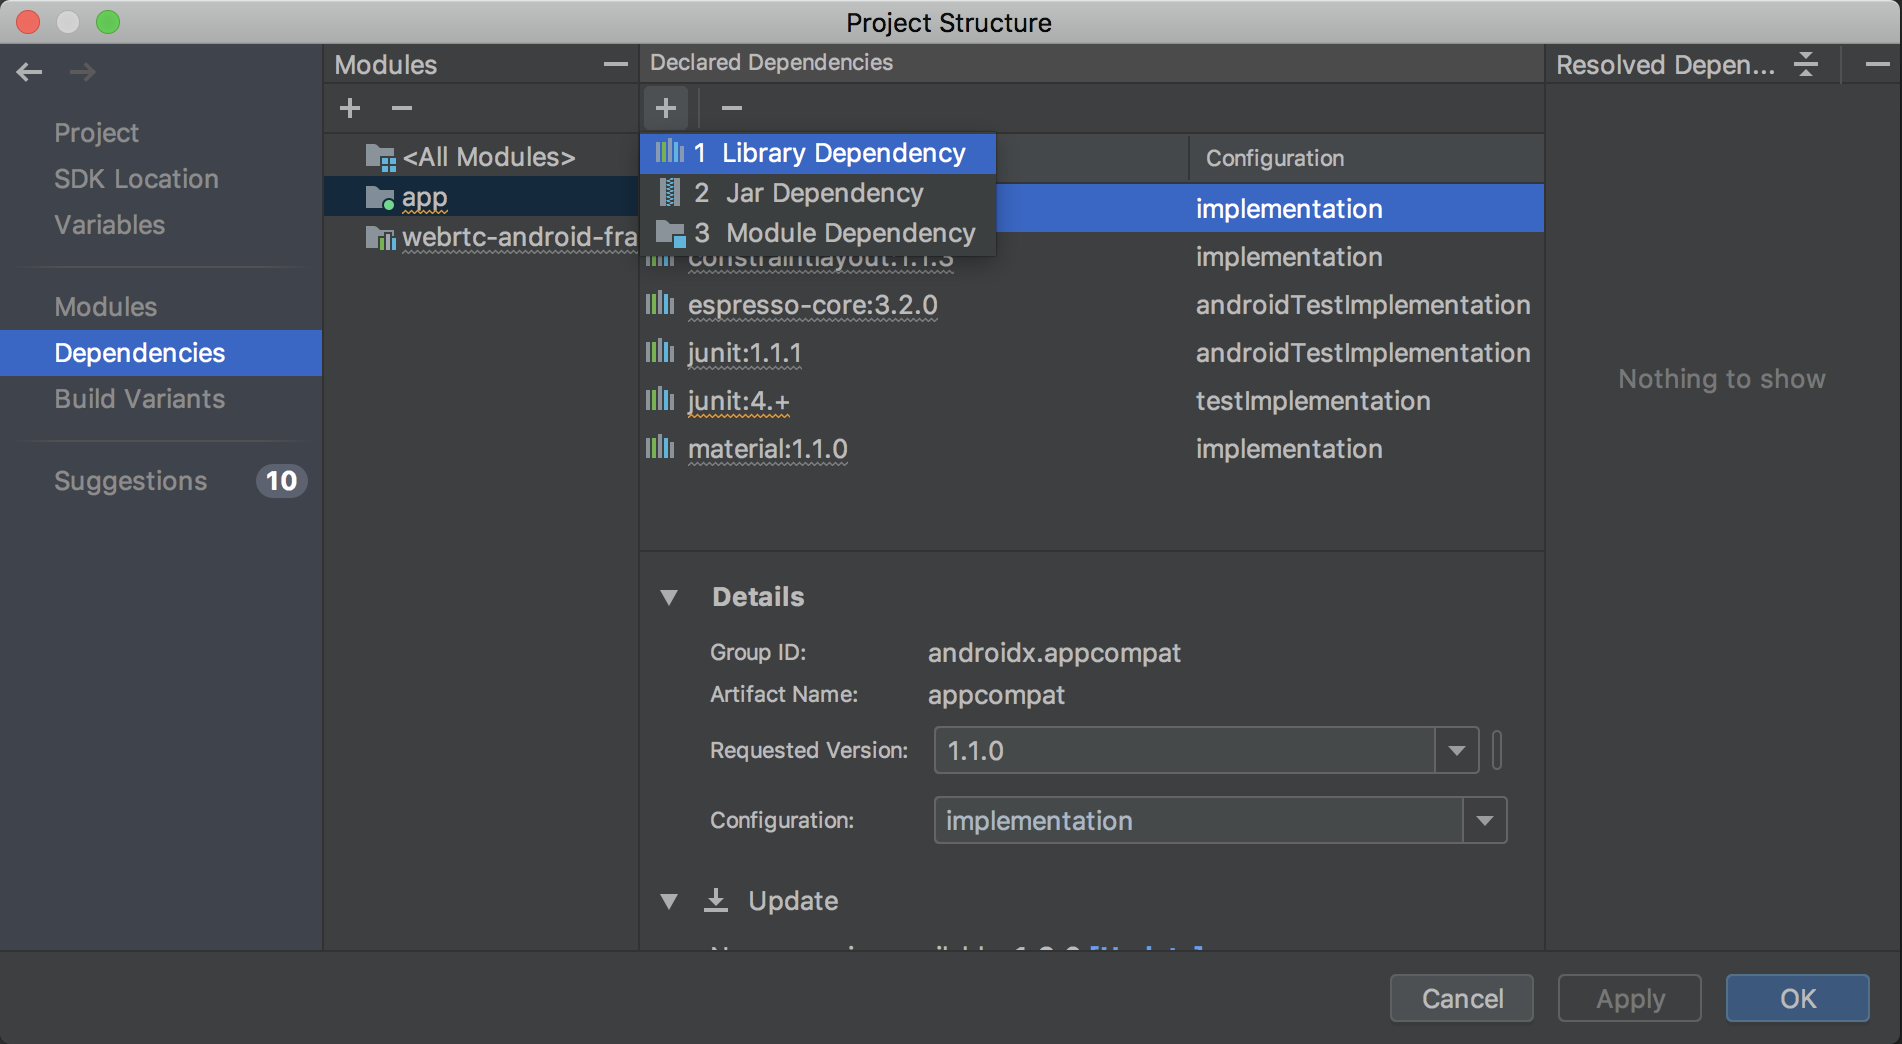
Choose WebRTC Native Android SDK and click OK button
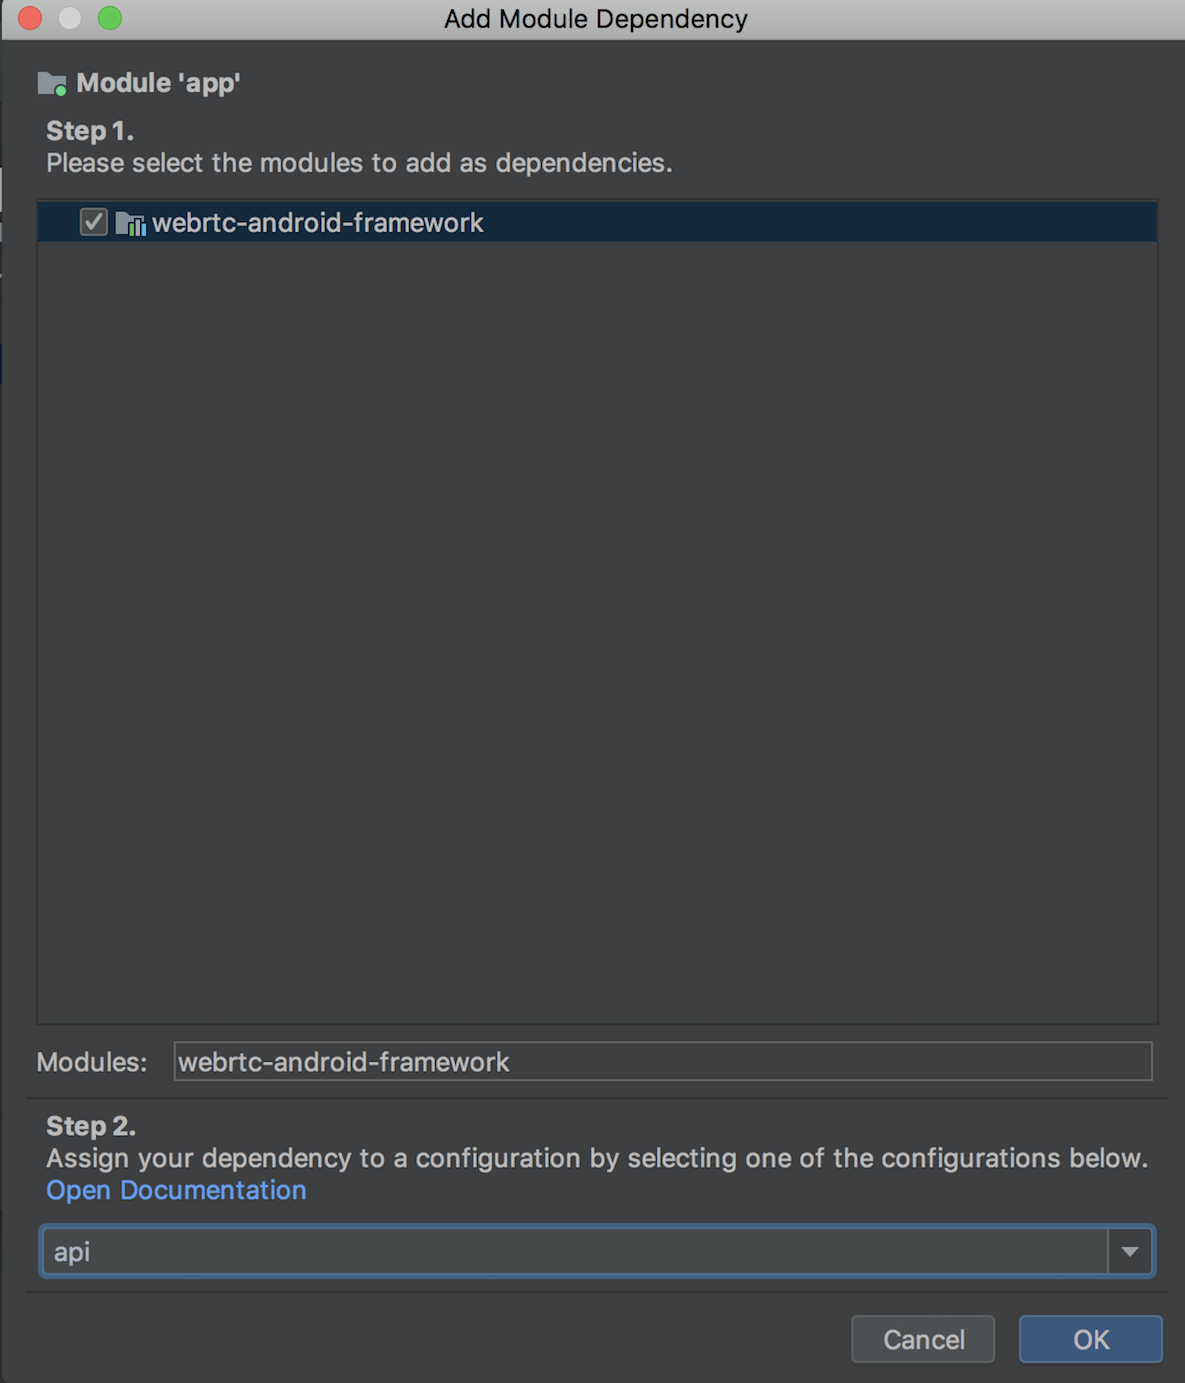
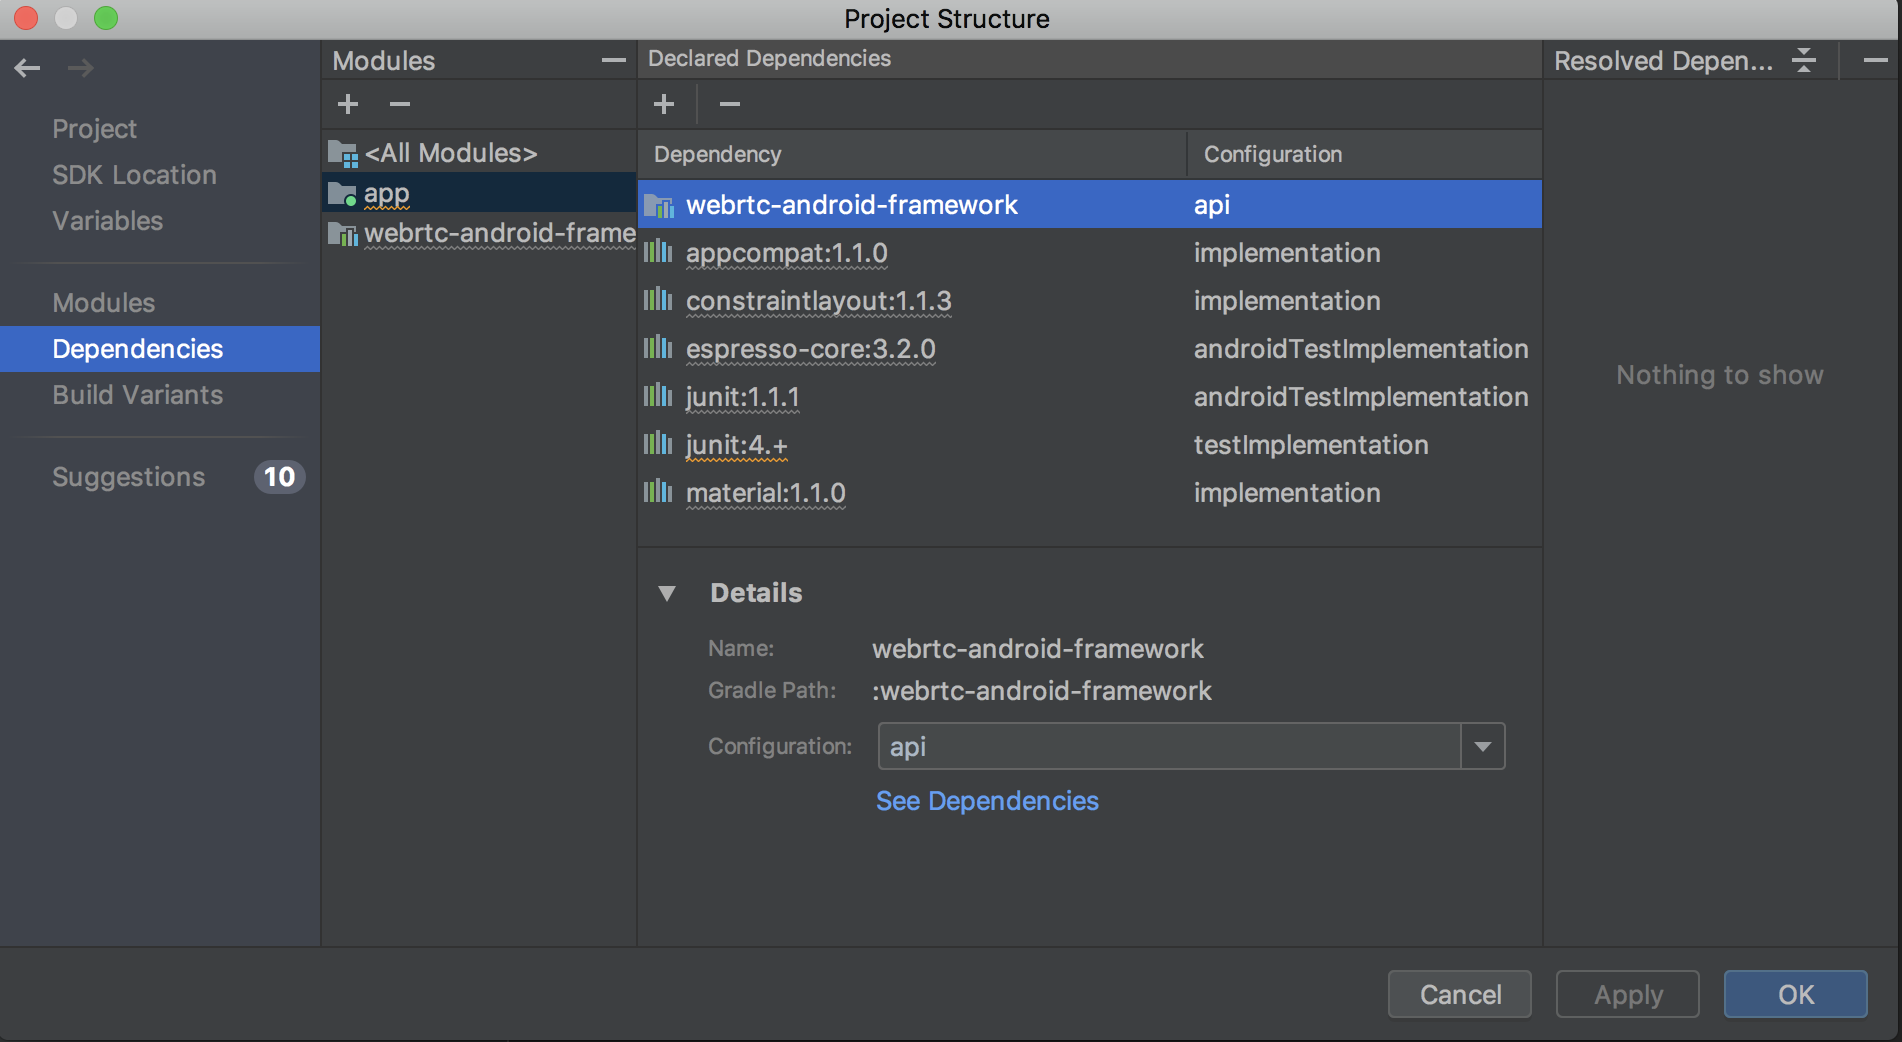
CRITICAL thing about that You need import Module as an API as shown in the image above.It will look like as in the image below after adding the dependency:
Prepare the App for Streaming
- Create a MainActivity.java Class and add a Button to your activity main layout. This is just simple Android App development, we don’t give details here. You can get lots of tutorials about that on the Internet.
- Add permissions in Manifest file.
Open the AndroidManifest.xml and add below permissions between application and manifesttag
    <uses-feature android:name="android.hardware.camera" />
    <uses-feature android:name="android.hardware.camera.autofocus" />
    <uses-feature
        android:glEsVersion="0x00020000"
        android:required="true" />

    <uses-permission android:name="android.permission.CAMERA" />
    <uses-permission android:name="android.permission.CHANGE_NETWORK_STATE" />
    <uses-permission android:name="android.permission.MODIFY_AUDIO_SETTINGS" />
    <uses-permission android:name="android.permission.RECORD_AUDIO" />
    <uses-permission android:name="android.permission.BLUETOOTH" />
    <uses-permission android:name="android.permission.INTERNET" />
    <uses-permission android:name="android.permission.WRITE_EXTERNAL_STORAGE" />
    <uses-permission android:name="android.permission.ACCESS_NETWORK_STATE" />
    <uses-permission android:name="android.permission.READ_PHONE_STATE" />
    <uses-permission android:name="android.permission.READ_EXTERNAL_STORAGE" />
Implement MainActivity onCreate function
Open the MainActivity.java and implement it as below. You should change SERVER_URL according to your Ant Media Server address. Secondly, the third parameter in the last line of the code below is IWebRTCClient.MODE_PUBLISH that publishes the stream to the server. You can use IWebRTCClient.MODE_PLAY for playing stream and IWebRTCClient.MODE_JOIN for P2P communication. If token control is enabled, you should define tokenId parameter.
   /**
     * Change this address with your Ant Media Server address
     */
    public static final String SERVER_ADDRESS = "serverdomain.com:5080";

    /**
     * Mode can Publish, Play or P2P
     */
    private String webRTCMode = IWebRTCClient.MODE_PLAY;

    public static final String SERVER_URL = "ws://"+ SERVER_ADDRESS +"/WebRTCAppEE/websocket";
    public static final String REST_URL = "http://"+SERVER_ADDRESS+"/WebRTCAppEE/rest/v2";
    private CallFragment callFragment;

    private WebRTCClient webRTCClient;

    private Button startStreamingButton;
    private String operationName = "";
    private Timer timer;
    private String streamId;

    @RequiresApi(api = Build.VERSION_CODES.M)
    @Override
    protected void onCreate(Bundle savedInstanceState) {
        super.onCreate(savedInstanceState);

        // Set window styles for fullscreen-window size. Needs to be done before
        // adding content.
        requestWindowFeature(Window.FEATURE_NO_TITLE);
        getWindow().addFlags(WindowManager.LayoutParams.FLAG_FULLSCREEN | WindowManager.LayoutParams.FLAG_KEEP_SCREEN_ON
                | WindowManager.LayoutParams.FLAG_DISMISS_KEYGUARD | WindowManager.LayoutParams.FLAG_SHOW_WHEN_LOCKED
                | WindowManager.LayoutParams.FLAG_TURN_SCREEN_ON);
        //getWindow().getDecorView().setSystemUiVisibility(getSystemUiVisibility());

        setContentView(R.layout.activity_main);
        SurfaceViewRenderer cameraViewRenderer = findViewById(R.id.camera_view_renderer);
        SurfaceViewRenderer pipViewRenderer = findViewById(R.id.pip_view_renderer);

        startStreamingButton = (Button)findViewById(R.id.start_streaming_button);

        // Check for mandatory permissions.
        for (String permission : CallActivity.MANDATORY_PERMISSIONS) {
            if (this.checkCallingOrSelfPermission(permission) != PackageManager.PERMISSION_GRANTED) {
                Toast.makeText(this, "Permission " + permission + " is not granted", Toast.LENGTH_SHORT).show();
                return;
            }
        }

        if (webRTCMode.equals(IWebRTCClient.MODE_PUBLISH)) {
            startStreamingButton.setText("Start Publishing");
            operationName = "Publishing";
        }
        else  if (webRTCMode.equals(IWebRTCClient.MODE_PLAY)) {
            startStreamingButton.setText("Start Playing");
            operationName = "Playing";
        }
        else if (webRTCMode.equals(IWebRTCClient.MODE_JOIN)) {
            startStreamingButton.setText("Start P2P");
            operationName = "P2P";
        }

        this.getIntent().putExtra(EXTRA_CAPTURETOTEXTURE_ENABLED, true);
        this.getIntent().putExtra(EXTRA_VIDEO_FPS, 30);
        this.getIntent().putExtra(EXTRA_VIDEO_BITRATE, 2500);
        this.getIntent().putExtra(EXTRA_CAPTURETOTEXTURE_ENABLED, true);

        webRTCClient = new WebRTCClient( this,this);

        //webRTCClient.setOpenFrontCamera(false);

        streamId = "stream1";
        String tokenId = "tokenId";

        webRTCClient.setVideoRenderers(pipViewRenderer, cameraViewRenderer);

       // this.getIntent().putExtra(CallActivity.EXTRA_VIDEO_FPS, 24);
        webRTCClient.init(SERVER_URL, streamId, webRTCMode, tokenId, this.getIntent());
    }

    public void startStreaming(View v) {
        if (!webRTCClient.isStreaming()) {
            ((Button)v).setText("Stop " + operationName);
            webRTCClient.startStream();
        }
        else {
            ((Button)v).setText("Start " + operationName);
            webRTCClient.stopStream();
        }
    }
Create activity_main.xml layout
Create an activity_main.xml layout file and add below codes.
    <?xml version="1.0" encoding="utf-8"?>
    <FrameLayout xmlns:android="http://schemas.android.com/apk/res/android"
        xmlns:app="http://schemas.android.com/apk/res-auto"
        xmlns:tools="http://schemas.android.com/tools"
        android:layout_width="match_parent"
        android:layout_height="match_parent"
        tools:context=".MainActivity">

    <org.webrtc.SurfaceViewRenderer
        android:id="@+id/camera_view_renderer"
        android:layout_width="match_parent"
        android:layout_height="wrap_content"
        android:layout_gravity="center" />

    <org.webrtc.SurfaceViewRenderer
        android:id="@+id/pip_view_renderer"
        android:layout_height="144dp"
        android:layout_width="wrap_content"
        android:layout_gravity="bottom|end"
        android:layout_margin="16dp"/>

    <Button
        android:layout_width="wrap_content"
        android:layout_height="wrap_content"
        android:text="Start"
        android:id="@+id/start_streaming_button"
        android:onClick="startStreaming"
        android:layout_gravity="bottom|center"/>

    <FrameLayout
        android:id="@+id/call_fragment_container"
        android:layout_width="match_parent"
        android:layout_height="match_parent" />

    </FrameLayout>
How to Publish
We need to change some codes in onCreate. As a result, following code snippets just publish the stream on your server with streamId: ‘stream1’.
- You need to set
webRTCModetoIWebRTCClient.MODE_PUBLISH.
private String webRTCMode = IWebRTCClient.MODE_PUBLISH;How to Play
Playing a Stream is almost the same as Publishing. We just need to change some codes in onCreate. As a result, the following code snippets just plays the stream on your server with streamId: ‘stream1’. Make sure that, before you try to play, you need to publish a stream to your server with having stream id ‘stream1’
- You need to set
webRTCModetoIWebRTCClient.MODE_PLAY.
private String webRTCMode = IWebRTCClient.MODE_PLAY;How to use Data Channel
Ant Media Server and Android SDK can use data channels in WebRTC. In order to use Data Channel, make sure that it’s enabled both server-side and mobile.
Before initialization of webRTCClient you need to:
- Set your Data Channel observer in the WebRTCClient object like this:
webRTCClient.setDataChannelObserver(this);- Enable data channel communication by putting following key-value pair to your Intent before initialization of WebRTCClient with it:
this.getIntent().putExtra(EXTRA_DATA_CHANNEL_ENABLED, true);Then your Activity is ready to send and receive data.
- To send data, call
sendMessageViaDataChannelmethod of WebRTCClient and pass the raw data like this on click of a button:
webRTCClient.sendMessageViaDataChannel(buf);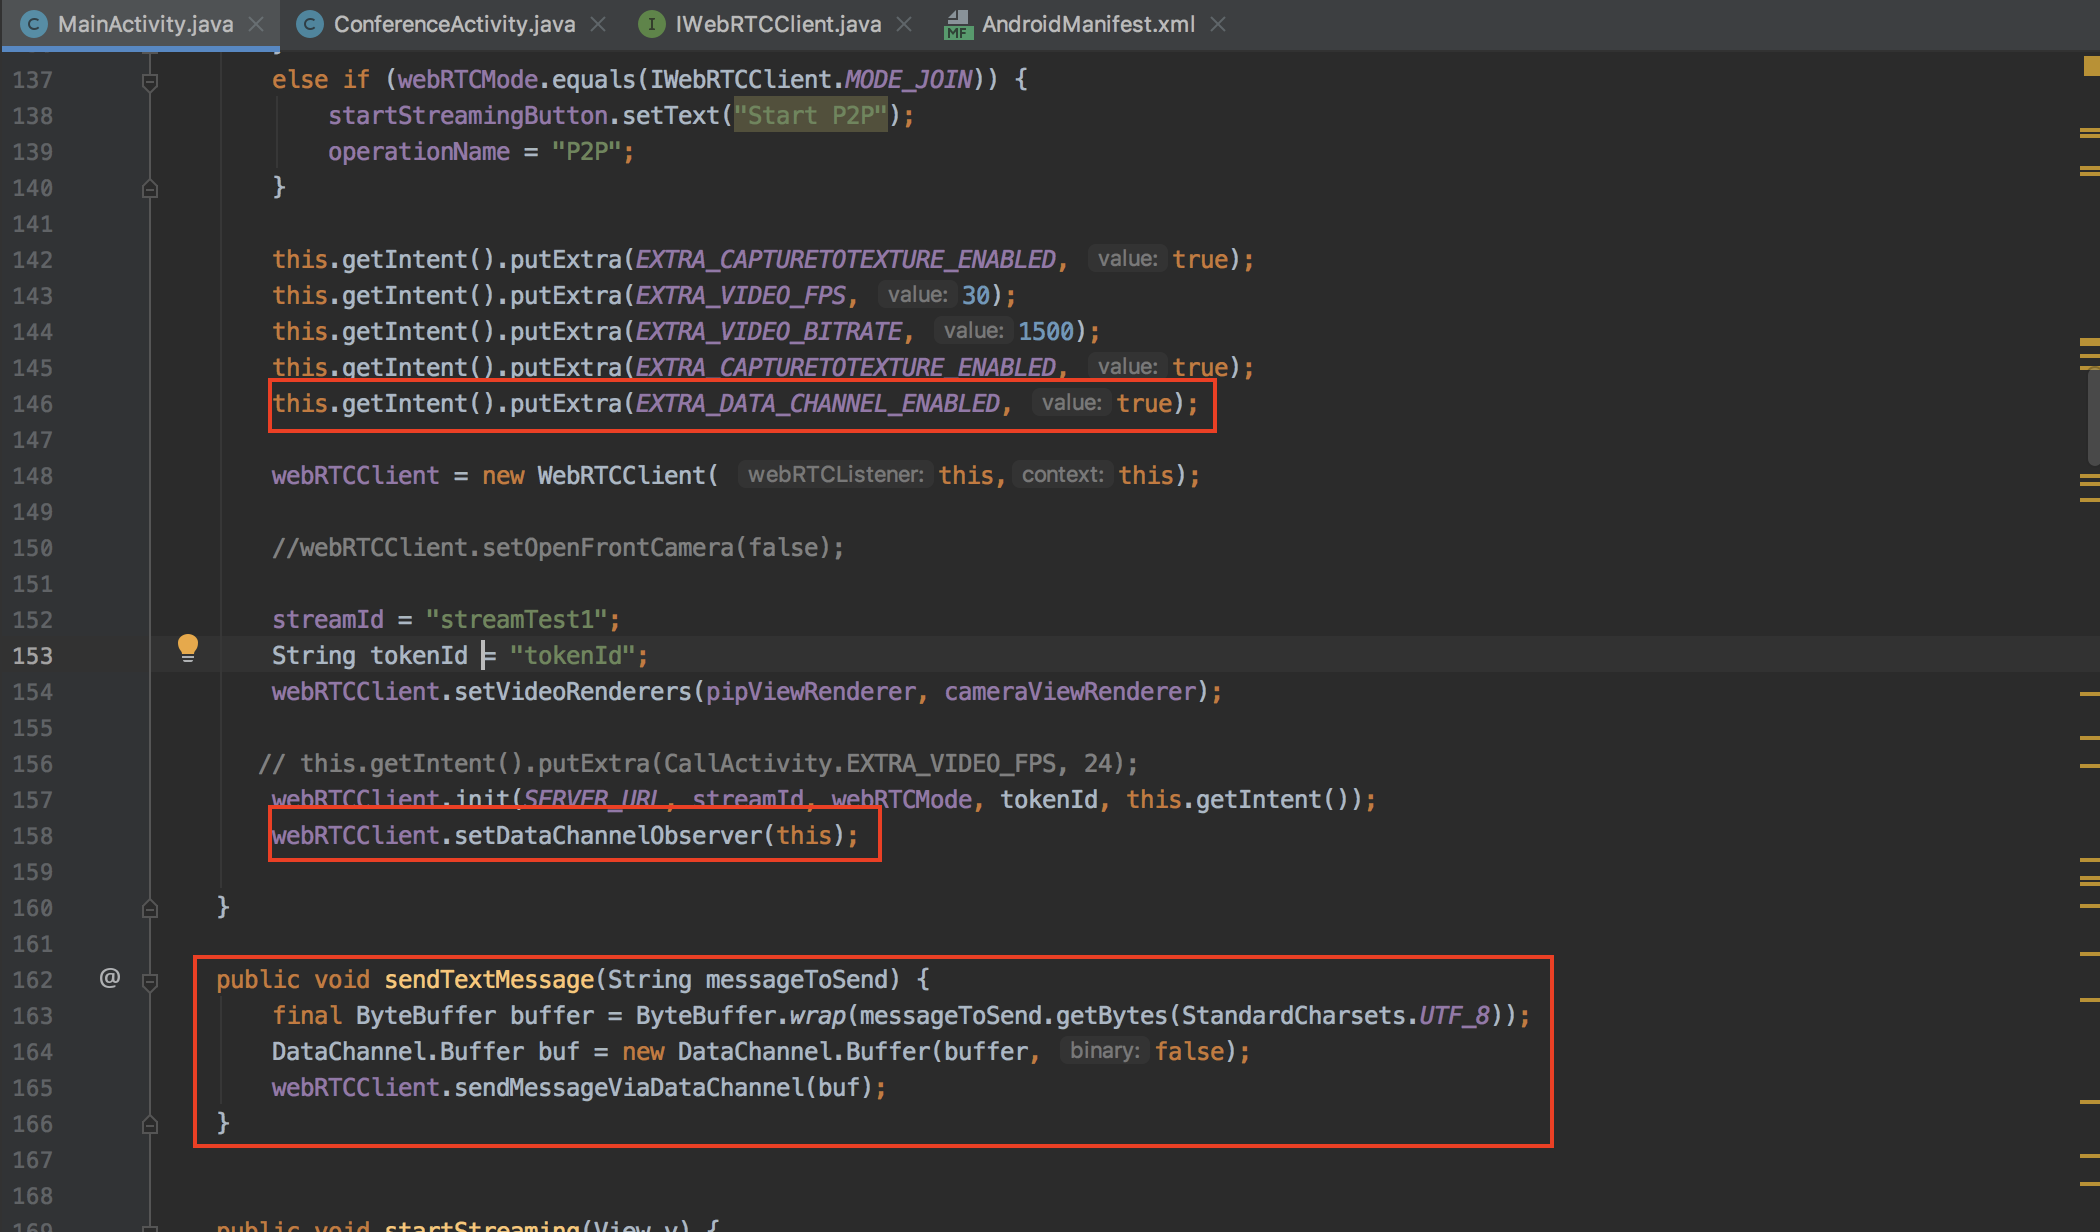
How to use Conference Room
Ant Media Server also supports ConferenceRoom feature. You need to initialize ConferenceManager.
    private ConferenceManager conferenceManager;

    conferenceManager = new ConferenceManager(
                this,
                this,
                getIntent(),
                MainActivity.SERVER_URL,
                roomId,
                publishViewRenderer,
                playViewRenderers,
                streamId,
                this
     );
Check also -> https://github.com/ant-media/Ant-Media-Server/wiki/WebRTC-Conference-Call
We hope this tutorial will be helpful for you, if you have any question, just send an email to contact@antmedia.io 🙂




Comments
Post a Comment